I was perusing the Internet as I often do, and I found a video of the talented team of animators who were in charge of creating environments and stills for the 1988 movie, Akira.
If you haven’t seen Akira, it takes place in an unfriendly and foreboding urban, post-apocalyptic Tokyo, (named ‘Neo-Tokyo’), populated by biker gangs and other cyberpunk elements which have stood the test of time.
These animators, crammed into their smallish offices and rooms, were painstakingly painting the most minuscule detail of some urban backgrounds and environments, often with backgrounds being used for mere seconds in the film.
Seeing this changed the way that I looked at anime as a whole.
As an American, I’m familiar with great classic animes like those in the Dragonball franchise, but I have never seen the actual, insane detail in which anime artists put their time and dedication into.
Perhaps even more impressive was the way in which the characters were drawn. Anime characters have such iconic and signature poses that set them apart from other forms of animation.
Anime has become an unforgettable staple in not only animated media worldwide but has become a beloved and impressive touchstone of culture. With this being the case, who wouldn’t want to learn how to draw a character in some of the most iconic styles that anime has to offer?
Drawing Anime Characters
As cool as it would be to be able to crank out drawings that looked like Goku or Vegeta, it isn’t going to be as easy in the first stages, I’m sorry to say.
Drawing an anime character involves what nearly all other illustrators dealing with animation deal with creating an actual character for their character. How boring would Vegeta as a character be if he didn’t have his signature grimace, his self-serving smile, an air of unapproachability?
The talented animators of Vegeta made him a force to be reckoned with, and viewers of the show will immediately know that he’s a character you simply don’t mess around with. This is drawing character, or creating and drawing the nuances, expressions, and overall attitude of your character.
Anime characters have a general formula for drawing a face. Usually, measurements on a would-be character face have specific measurements of the distance of their features from one another.
For example, the distance between the chin and the mouth is usually around ⅛, while the distance from the tops of the eyes to the bottom of the nose is usually ¼.
Learn 2D Anime Animation
Good Drawing Practices
Like any art form, anime has some methods in which to ensure that you, the artist, stays on top of the best way to convey a character’s action. Let’s look at some good practices to engage in, and hopefully turn into good drawing habits.
Study Real-Life Anatomy
You would be surprised by how similar anime characters have in common to real-life human movement. We really don’t think of animation sharing a lot with our own, unique anatomy.
With anime, these characters do nearly all of the same body movements we do, and by brushing up on even the most basic tenets of anatomy can help you animate your characters tremendously.
Don’t Be Afraid to Fail!
I know this may hurt, but being an artist is filled with failures and setbacks. Anime is no stranger to those who get frustrated, come up upon certain artistic roadblocks, and more.
Although it would be fantastic to start drawing world-class anime as soon as you pick up a pencil, it will most likely be a difficult journey getting the basics down naturally, and that’s okay!
Don’t be discouraged by failures or setbacks. Even the most talented and well-known artists struggled tremendously in their earlier days.
Be Open to Criticism
This is the biggest hurdle for me to clear. Many people don’t want to hear negative feedback on their work, it’s just a natural inclination. However, if you find yourself in a position of professional artist, or in art school, you will receive criticism about your work.
Everyone is different, and some will be critical of certain aspects of your work, while others will find something wrong in everything. This is where the concept of constructive criticism comes in.
Ideally, you want someone to give you criticism that helps rather than absolutely crushes your dreams. When someone criticizes your work, don’t take it too personally, as the standards of anime are pretty high.
No Plagiarism, EVER!
Like with any other art form or submitted work, plagiarism and copying is a 100% no-no. This is crucial. Not only is it artistically dishonest, but it could land you in a lot of trouble.
Do you really want to be known as someone who copies other artistic styles blatantly? It is a matter of integrity and you need to keep your ideas your own.
It’s more acceptable to be influenced by the ideas and art of other animators, where your unique characters and environments share the influence of other artists. For example, you can have characters that resemble the style of Miyazaki.
Whatever you do, NEVER outright copy or steal someone’s ideas or artwork.
Experiment Often
One way to ensure that you are growing as an anime artist is to experiment in any way you can. There is nothing wrong with drawing what you know; we all do it.
However, if you just stick to your own style all of the time, you will have a more difficult time branching out and trying new ideas. No one wants to be a one-trick pony, where you can only draw a certain subset of character or environment.
Experimenting and trying new ideas can not only help you grow as an artist, but it can help you discover new styles that may ‘click’ better than you thought they would.
Beware Too Much Praise
Alright, so this one seems a bit strange, as we as humans love praise, who doesn’t? However, consider where the praise is coming from. Is it an objective source? What I mean is that the chances that close family members or friends praising you without a close, critical eye could make being an artist problematic.
While these people mean well, if they blindly praise your work without properly examining it, then you can be setting yourself up for lack of growth, or engaging in bad anime drawing practices.
By all means, accept praise, you deserve it! However, just be wary of where the source of praise is coming from, especially if you are looking for a deep, critical eye for your work.
Have Fun!
Arguably the most important good practice of drawing anime is to have fun. If you aren’t deriving joy and excitement from your art skills, why are you drawing in the first place?!
Even if you receive criticism that cuts deep, if you are having fun drawing anime, really lean into that and have that love of anime drive your forward past the negativity.
Reference Images are Extremely Helpful
If you find yourself struggling, especially if studying anatomy is a drag, reference images of poses and your favorite anime characters and drawings are just a click away. Gain valuable inspiration and glean some knowledge from images. Study them, get to know the poses, and the trends in action to better help you on your artistic journey.
You’re Not Too Cool For Guides!
I know if you feel that you’re a great artist, that you may be able to skip valuable guidelines completely, but you’re wrong! Using guides are extremely helpful, and they are there for a reason.
Use them, learn them, live them.
These guides are made especially for you, so use them to the best of your ability. Don’t think that you’re too cool to skip out on guidelines, as blatantly ignoring them could actually end up hurting you in the long run.
These vary, but a good rule of thumb is to have this be the primer for starting an anime character. There are similar rules of thumb for drawing the standard anime facial structure and features, but let’s diverge from that for a bit and examine some basics when it comes to anime poses and drawing techniques.
Basic Anime Poses
Having the perfectly drawn anime face is great and a feat to be proud of, but what happens when you want to animate that character?
You need to start somewhere.
That’s why we’re going to lay out the basics of the most common poses, how to draw them, and which works best for you personally.
You could be one of the best anime artists alive today, but if you can’t properly pose these well-drawn characters, what’s the point?
You want to make sure whatever that you are trying to convey with your art is properly conveyed, otherwise, your message, art, and characterization could absolutely fall flat.
If you aren’t well-versed in posing anime characters, you could end up drawing awkward, stilted, and overall ineffective characters.
Running Pose (Step by Step Process)
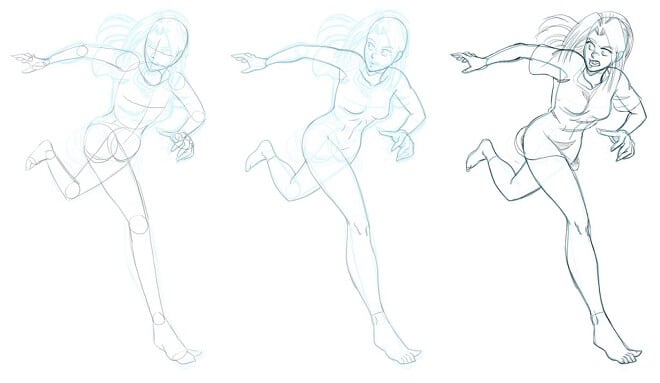
Any good, action-packed anime involves multiple running poses to put characters in. Whether the anime character is running to or from an enemy, outrunning physical harm, or simply running to a class they’re late for, the running pose is perhaps one of the most widely known and used poses in anime.
Let’s examine some of the fundamentals of the running pose, followed by a step-by-step breakdown of how to do it yourself.
For this pose, we will just examine the fundamentals of running, as there are different degrees of running, (sprinting, jogging, etc.).
Drawing the Torso
In the first step, you draw the core of your character, the torso. The torso is what guides the rest of the character’s body. In the running pose, try drawing the character’s torso at about a ¾ angle, where the top is slightly leaning toward the ground.
It’s noteworthy and helpful to fill out some minor details of the torso to help you draw the character further. For example, detail the outline of the shoulders to further give you a guideline of what to draw around and basically fill in.
Drawing the Head
This is pretty straightforward. You simply draw the head of your character at about the same angle as the torso, so it is lining up slightly. This could also vary, as you could have the character’s head be parallel to the ground if your character is really sprinting. But for the step-by-step, let’s keep it pretty simple.
Drawing the legs
Drawing the legs is where the figure really starts to take shape. You need to emphasize the forward motion in the legs by drawing the proper shapes and lining up the legs in a way to show realistic running.
What you need to do is draw one leg that lines up with the head and the torso, creating a sort of straight, yet tilted line that runs through the entirety of the character’s body.
With the other leg, have the knee pointed almost straight forward. Regarding the feet, you should take physics into account. This means that the foot attached to the leg that is lined up with the body will be bent at the toes, which shows that the character is pushing off on that foot.
Drawing the Arms
This is where a lot of the momentum of your character appears. You should draw the arms in opposition with the direction in which the legs are drawn. For example, have the right arm be raised while the left leg is behind the character and vice versa. Keep the arms bent at the elbow.
Drawing the Neck
The neck will be pretty much in line with the rest of the character’s body. This is a fairly simple step that really pulls all of it together.
The Ballet Pose
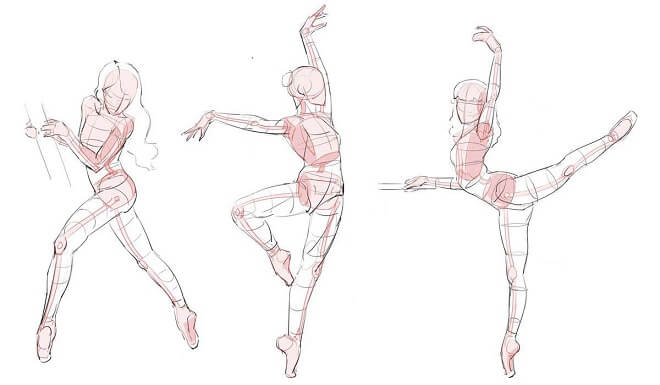
This pose showcases the flexibility of your character and can be an extremely helpful pose to draw to get all of the basics down.
Drawing the Torso
As with the running pose, we begin the Ballet pose with the torso, as it forms much of what the rest of the movements will look like. The torso in this case will be bent severely compared to running. Have it bent back, imagining that the character’s face is pointed more or less toward the ceiling.
Drawing the Head
Keeping in mind the face tilting upward, draw the head, and place emphasis on the chin guiding the rest of the head’s movements upward. Don’t be afraid to use yourself as a model!
Drawing the Legs
This is where the Ballet pose takes on a life of its own. The legs in the ballet pose are at a much more extreme angle than that of the running pose. They should resemble someone completing a split or other strenuous leg exercise. Make sure you keep the front leg bent at an angle perpendicular to the floor. Keep in mind, ballet dancers are always on their toes, so draw the feet with that rule in mind.
Drawing the Arms
The arms of your character will be bent completely behind them. They should be drawn straight backward, mostly in line with whoever leg you chose to be positioned in the back.
Drawing the Neck
The neck, once again, keeps in line with the majority of where the torso and rest of the body is.
The Punching Pose
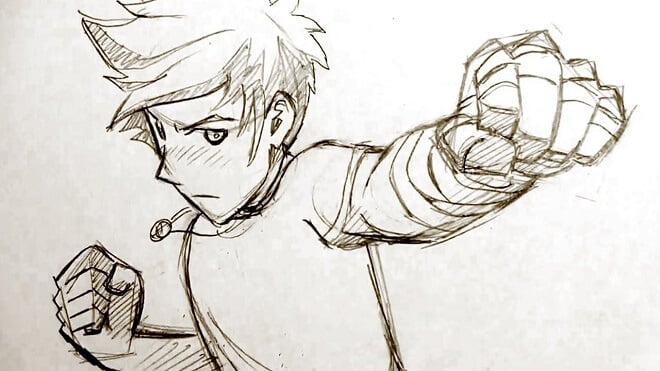
The punching pose is, you guessed it when a character is punching forward. Let’s take a look.
Drawing the Torso
You will begin by drawing the torso leaning forward. You’ll now be familiar with this positioning as it closely resembles that of the running pose. If you studied up on references or anatomy, you’ll know that you need to exhibit the character leaning forward to show that they’re putting a lot of power and weight behind this action.
Drawing the Head
This is a simple step, as you simply draw the head leaning forward, much like the rest of the body.
Drawing the Legs
Once again consider the running pose for the legs in this particular pose. The legs will be spread apart, with one leg dominant over the other and out in front. The leg in front will be flat-footed and the back leg will be lifted onto its toes.
Drawing the Arms
Okay, this is where the punching pose shines. Draw whichever arm you want to do the punching straight out front. Then, draw the other arm pulled back, close to the chest. This should look like someone is holding something close to their shoulder and armpit in a closed fist.
Drawing the Neck
Drawing the neck in a punching pose will have you drawing it a bit tilted forward, and motley tucked into the front of the torso and under the chin.
Throwing Pose
This pose heavily resembles the running and ballet poses. It’s when your character is throwing something with extreme force.
Drawing the torso
The torso should almost be parallel to the ground in this pose. You should Have the leg tilted slightly upward, like someone figure skating forward on one leg.
Drawing the Head
The character should look forward here, so make sure to line up the head so it’s similar to the torso.
Drawing the Legs
When drawing the legs, make one leg completely straight and point down to the ground. The other leg will act as the action’s momentum, being placed behind the character in a whimsical way.
Drawing the Arms
With throwing, this is the most important aspect. Both of the arms should be drawn in the same way, completely outstretched, but in opposite directions, the front tilted downward, and the back arm tilted upward behind the character.
Drawing the neck
The neck should stay in line with most of the body, namely the head and torso, so this is pretty simple.
What are some signature anime poses?
Now that we know a little bit more about creating and drawing an anime character, let’s dig into some signature poses that illustrators and studios use. This should give you a better idea of how certain anime took advantage of basic animation techniques.
Many of the poses and techniques are named after the studio or artist that has become famous for implementing them in anime.
I guarantee you’ll learn these poses and find yourself saying “oh yeah! I’ve seen that!” the whole way through.
Anime Signature Poses
The Gainax Stance
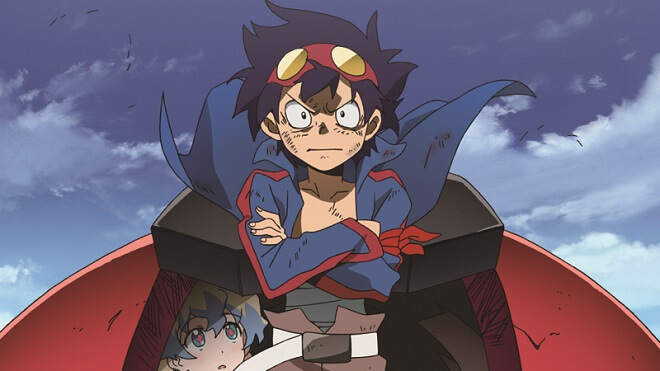
The Gainax Stance is an anime pose in which the anime character has its arms crossed over their chests. This has become a staple of the Gainax, the anime studio responsible for the manga and anime like Neon Genesis Evangelion and Nadia: The Secret of Blue Water, and was first seen in Hideaki Anno’s Gun Buster in 1988.
The Seed Pose
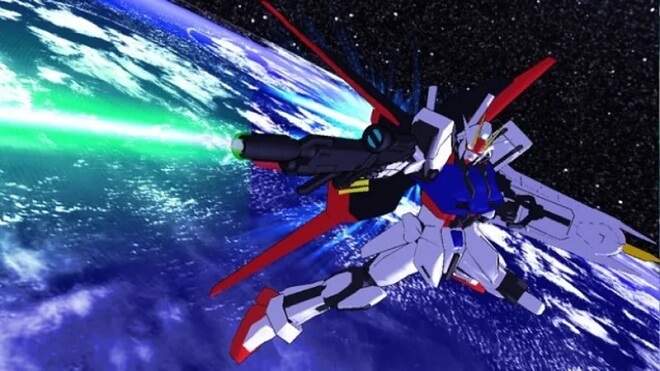
A pose that is extremely popular and widespread within the Gundam franchise, the seed pose, called ‘tane,’ is an action shot in which the character is usually midair, pointing their finger in a challenging way.
It’s a fantastic way to show off the intricacies of an anime figure, and as such, is favored by figure collectors everywhere, as it shows off how a figure can bend. And it also looks pretty cool, to boot.
The Yamada Mask
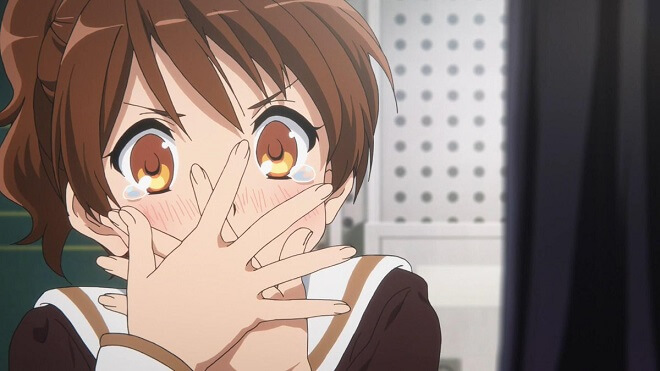
Named for noted anime great Naoko Yamada, the Yamada ‘mask’ is when an anime character often covers their mouth, either in embarrassment or shock. Yamada has implemented the Yamada Mask into multiple pieces of her work at Kyoto Animation, including Tamako Market, A Silent Voice, and K-On!
Yamada Hands, or ‘Yamada Paa’
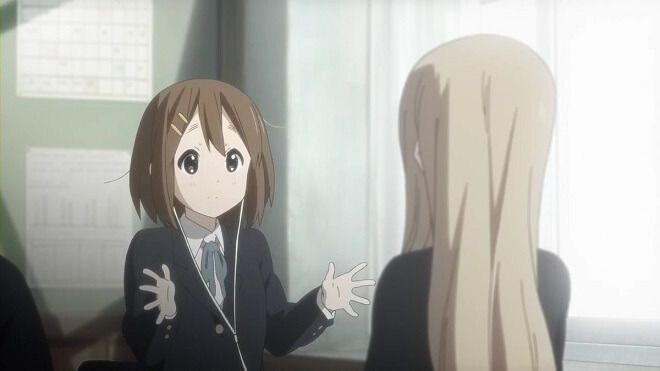
Not content with just one signature pose, the Yamada Hands comes courtesy of Naoko Yamada once again. Yamada Hands are implemented when chatters in the anime show their open palms. This is typically shown when characters are exhibiting that they’re no threat to the other characters or they’re confused or exasperated.
The Sunrise Stance, or Brave Perspective
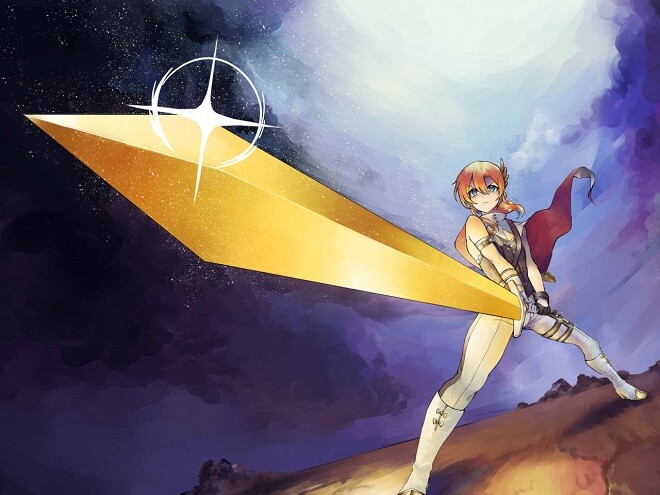
The sunrise stance is an epic pose that was made famous in the Gundam franchise. It’s an anime go-to pose whenever someone is locked in a fierce battle with another character. The Sunrise stance shows the character posing with a weapon at a wide-angle. It is sometimes called the Brave Perspective, as it has its roots in the Brave Series of anime.
It takes its name from Sunrise Studio, the team responsible for the rise of the popularity of mecha anime, specifically the influential title work of illustrator Masami Ōbari.
Today, it’s one of anime’s most famous and widespread poses, especially in combat-focused animation.
Itano Circus
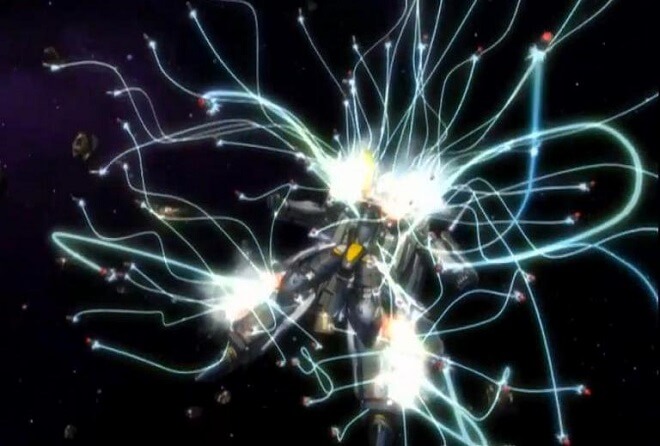
This is one of my personal favorites. The Itano ‘Circus’ is an animation technique when, during combat, a large number of missiles are launched at once and seem to snake around in a fantastic-looking visual spectacle.
The Itano Circus creates mind-blowing visuals, especially in animes that are fast-paced. It was developed and used by Ichirō Itano, one of the original animators on Mobile Suit Gundam in 1981, and Royal Space Force: The Wings of Honnêamise.
The Minagawa Fade
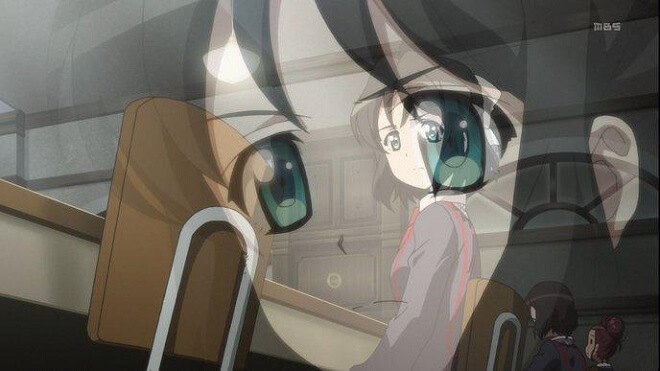
This is a useful and great-looking drawing technique that was introduced by Ryoji Minagawa, known for his work with anime, manga, and video games. The fade that he implemented uses a multiple exposure technique that adds drama, mystery, and adds a lot of depth to a scene.
Dezaki Direction Style
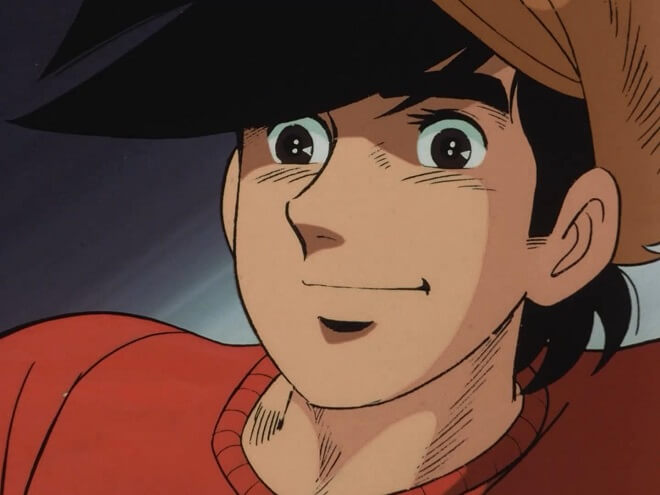
The Dezaki Direction Style is an old, beloved technique developed and used by Osamu Dezaki, one of the original animators for the iconic Astro Boy from 1963 to 1966.
Osamu Dezaki drew his frames in a washed-out style, with the character engaged in what was called ‘postcard memories,’ engaging the character in a freeze-frame sort of pose. Color and directional tilt make up the fundamentals of this anime pose.
The Dezaki Direction Style is still used today, especially in anime like the Gundam franchise and countless other modern animes.
The Shaft Angle, or ‘Shafuto Kakudo’
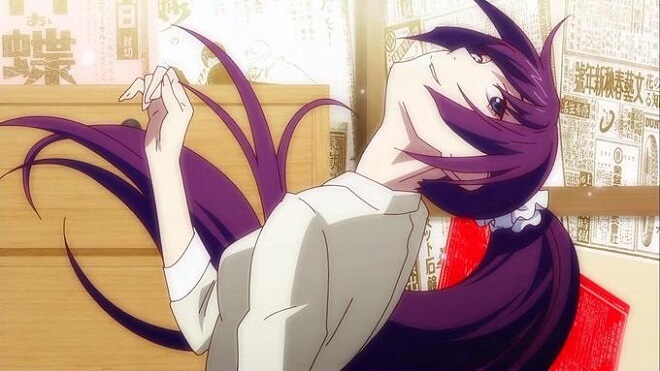
The Shaft Angle is a technique in which the animator makes the character tilt their head at a certain angle. This, of course, was pioneered by Studio Shaft, hence the name. You can find it employed in a ton of anime, especially by Studio Shaft titles like Sayonara, Zetsubou-Sensei, and Puella Magi Madoka Magica.
Final Thoughts
It’s plain to see that anime has had an amazing impact on popular culture not just in its native Japan, but all over the world. Now that you’re a little more familiar with the techniques employed by famous artists and studios, as well as some basic how-to tips, maybe you can draw some of your own manga, or even begin to animate some work of yours.
Just remember to follow some of the good practices, keep the fundamentals of animation in mind, and perhaps you’ll find yourself animating like a pro like Hayao Miyazaki, Osamu Tezuka, Hideaki Anno, Junji Ito, and Akira Toriyama.
We want to hear from you. To ask a question about this article or to provide additional information, shoot us a message at: [email protected]


Leave a Reply